Using Webhooks
Integrating with Webhooks
To incorporate webhooks within your integration, the following steps should be followed:
- Create a webhook subscription: Specify the secure HTTPS URL that should receive the webhook notifications from Svix, on your server, and the corresponding payment type updates to receive. This only needs to be configured at the beginning of each integration (not per-request), per client ID.
- Build in signature verification: Together with the webhook secret created from your webhook subscription, and each webhook's payload and signature, you would be able to verify that the webhook is indeed legitimate for processing. If signature verification is unsuccessful, the webhook should be discarded.
- Record the webhook contents: It is recommended you always capture webhook payloads for records and support purposes, to assist with any investigations or debugging that could be required in the future.
- Acknowledge the webhook receipt: An HTTP 200 response should be returned on a successfully-received webhook. If a non-200 is returned by your server, the webhook dispatch will be re-attempted later, based on the Svix retry policy.
- Process the webhook, idempotently: Update the status of the payment on your side (if the status has changed), based on the corresponding identifier or reference received in the webhook. It is important to make sure this processing is done idempotently, to avoid any potential double-allocation issues should a webhook be received multiple times.
Creating a Subscription
Creating a subscription may be done in one of 2 ways:
- Via our GraphQL API, or
- Directly on the Svix portal.
Via API
To subscribe over the Stitch API, any valid client token issued for one of your enabled payment types may be used — no webhook-specific scope is required. Only two fields are required for the subscription:
| Parameter | Usage |
|---|---|
url | The HTTPS endpoint on your server where you intend to receive your webhooks. |
filterTypes | The event(s) you wish to subscribe to, for the specified endpoint. See the full list of supported event types that may be subscribed to. |
In the below query example, the refund type is being subscribed to, for the Refunds product. Subsequently, this creates the subscription at Svix.
Via the Svix Portal
As the webhook subscription is managed via Svix, Svix provides a consumer portal that can be used to create your subscriptions, directly.
To access this consumer portal, follow the steps described in the client token guide to obtain a client token. Any valid client token issued for one of your enabled payment types may be used for webhook operations. You can then generate a single-use URL by running the query below (using your generated token):
This query returns a once-off link that can be opened to automatically log into the Svix consumer portal. If you have any endpoints setup already, you'll see a list showing each endpoint's URL, and its delivery error rate.
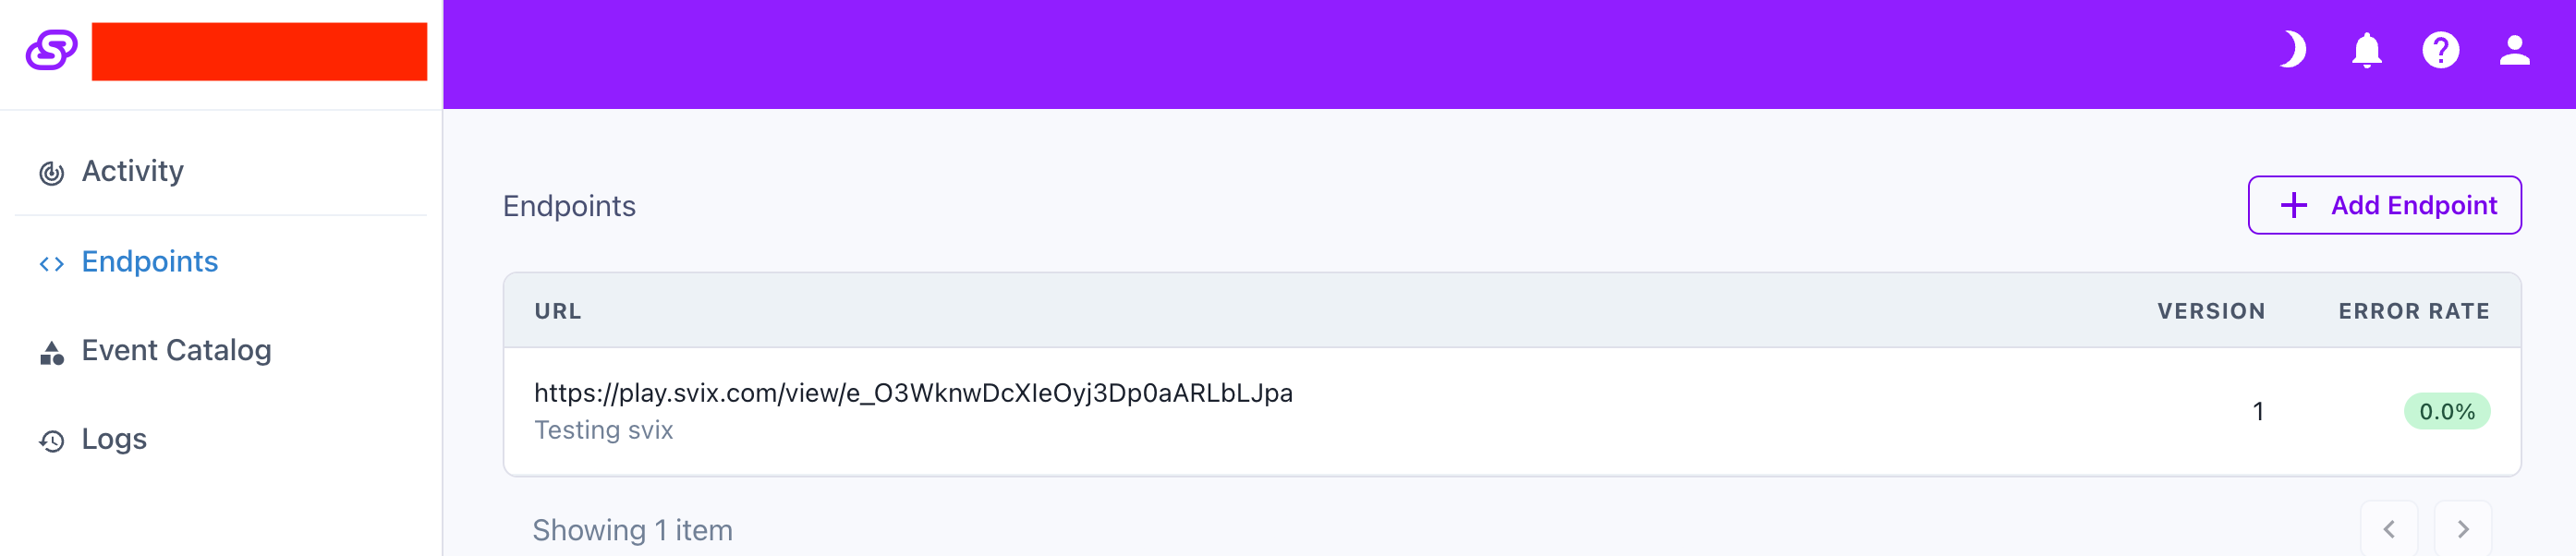
To subscribe your endpoint, specify your webhook URL to receive the events, with one or more event types to receive on the URL.
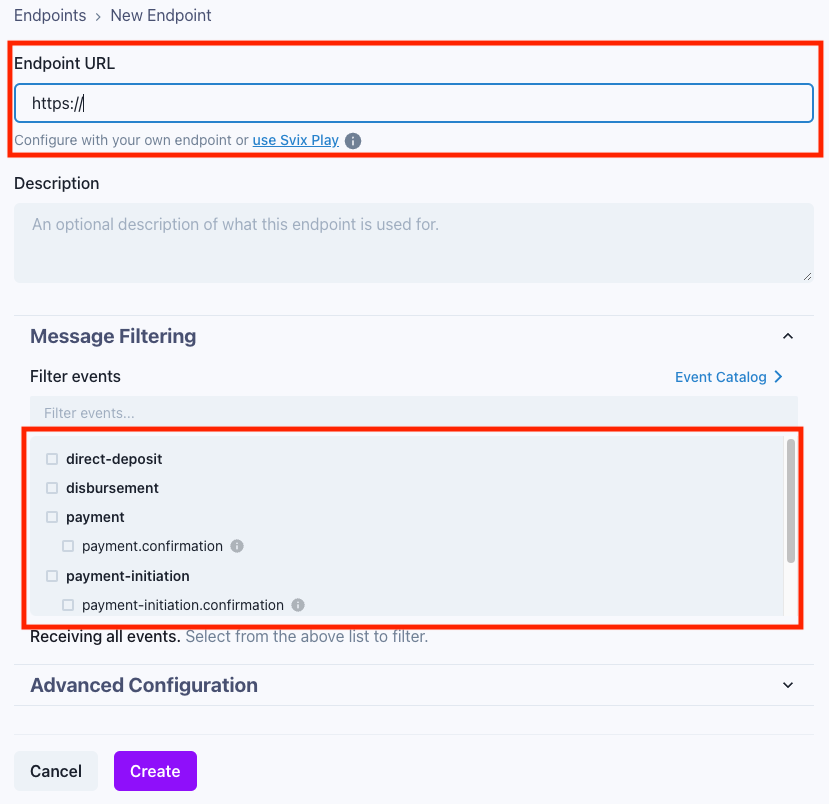
If you don't yet have an endpoint on your server ready to start receiving webhooks, just click the link to "use Svix Play button" to have a unique URL generated for you.
When using Svix Play, you are able to view and inspect all operational webhooks sent to your Svix Play URL, making it effortless to get started.
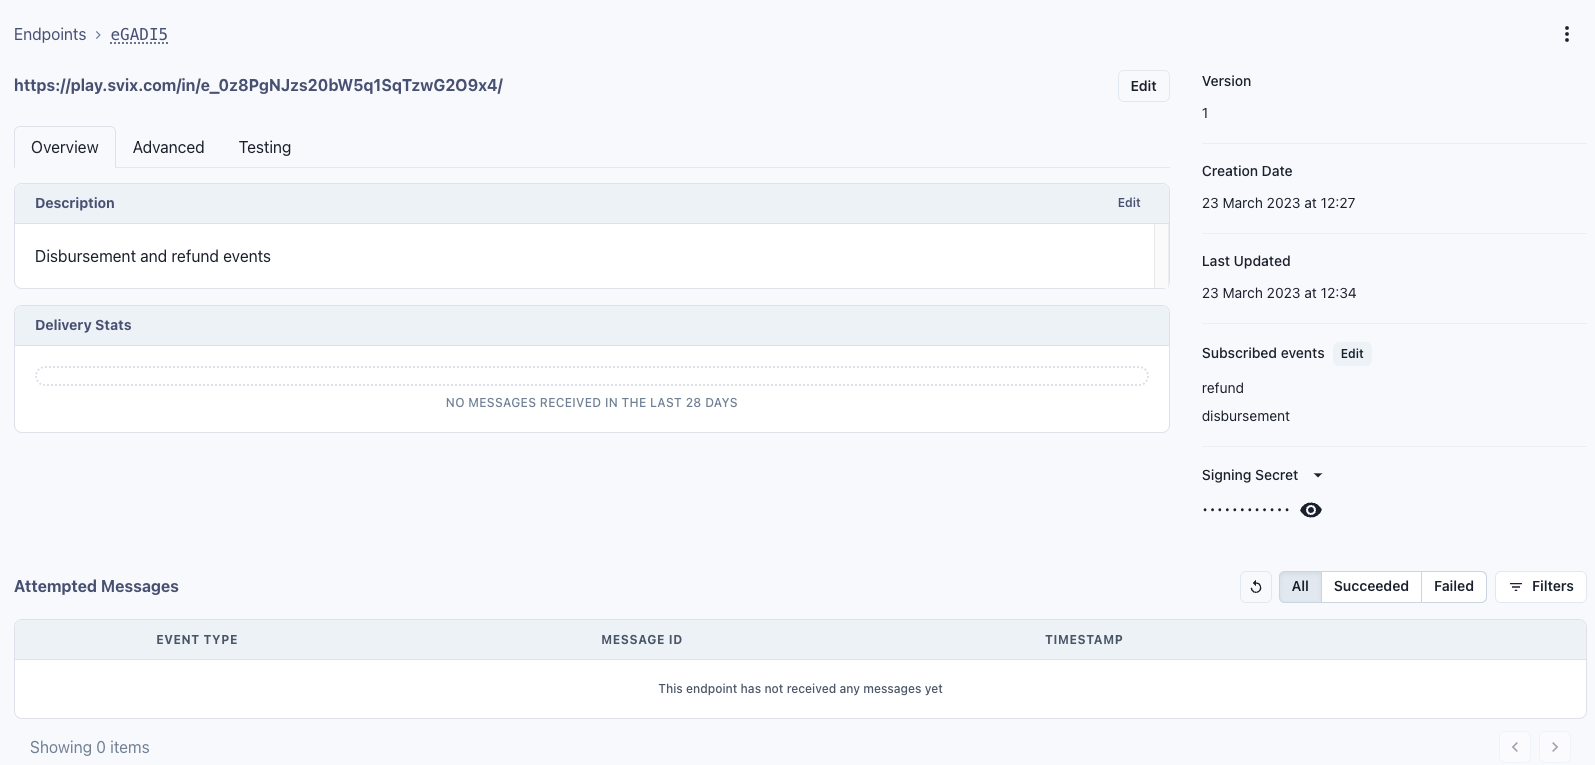
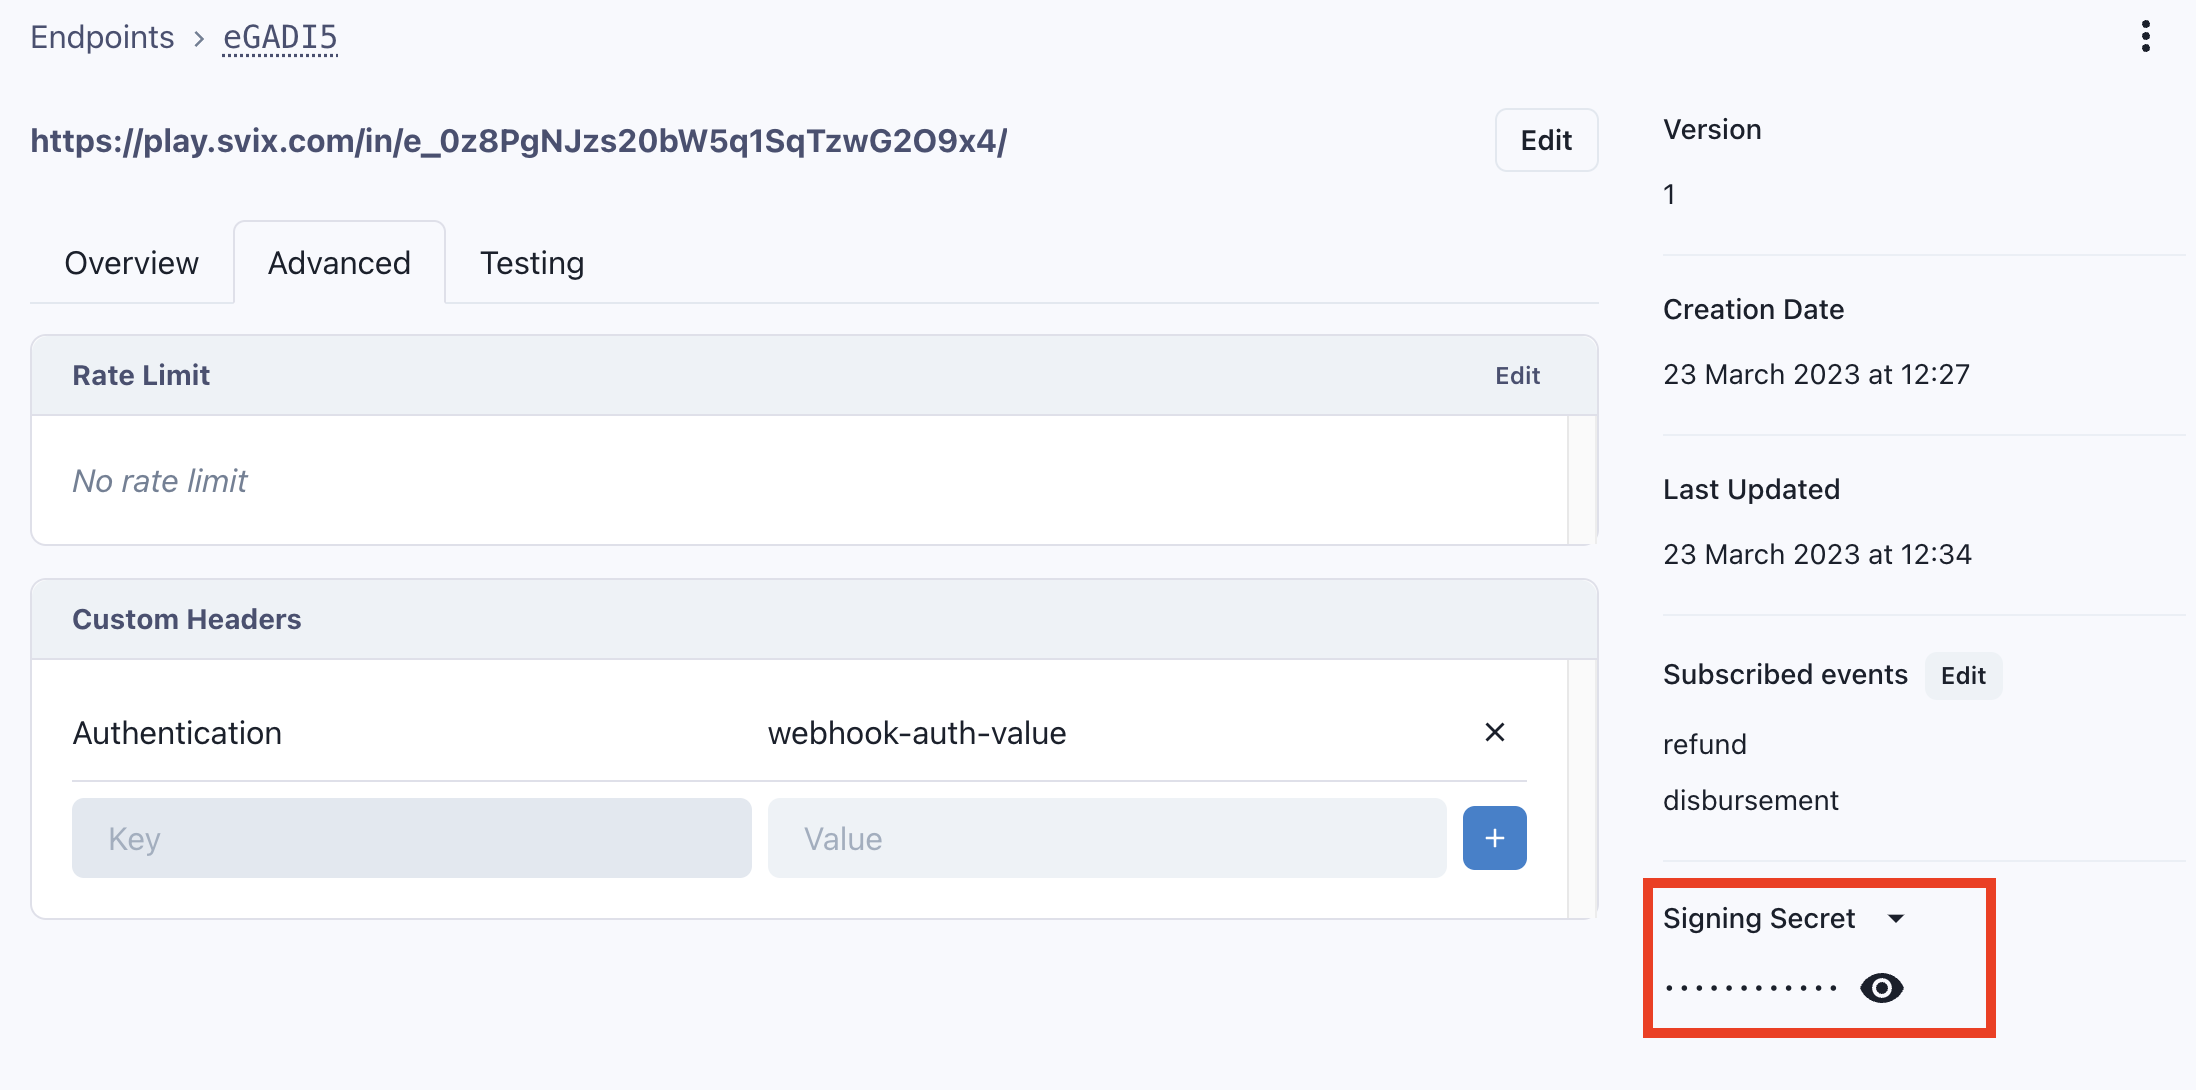
After specifying your URL and event types, click "Create". This will take you to the details page, where the Signing Secret may be viewed. Under the Advanced tab, you may also configure rate limiting and custom headers for your subscription.
In the below screenshot example, a subscription is created for disbursement and refund events, on a Svix play endpoint.
Consuming Webhook Events
After subscribing to an event, you will need to consume the webhooks as they get sent to your endpoint. A webhook notification is a simple POST request, with the body containing the event details. As part of processing this:
- Signature-Verify the message to confirm it was indeed received from Stitch, before processing it on your server.
- Acknowledge the notification with a successful HTTP response, once received as expected on your server.
Signature Verification
For added security, it is strongly recommended to signature-verify all webhooks received on your endpoint. As your receiving webhook endpoint would be publicly exposed, there is the possibility that anyone could send a message to it. Signature verification ensures you are processing a message sent by Stitch, and helps to avoid the risk of replay attacks.
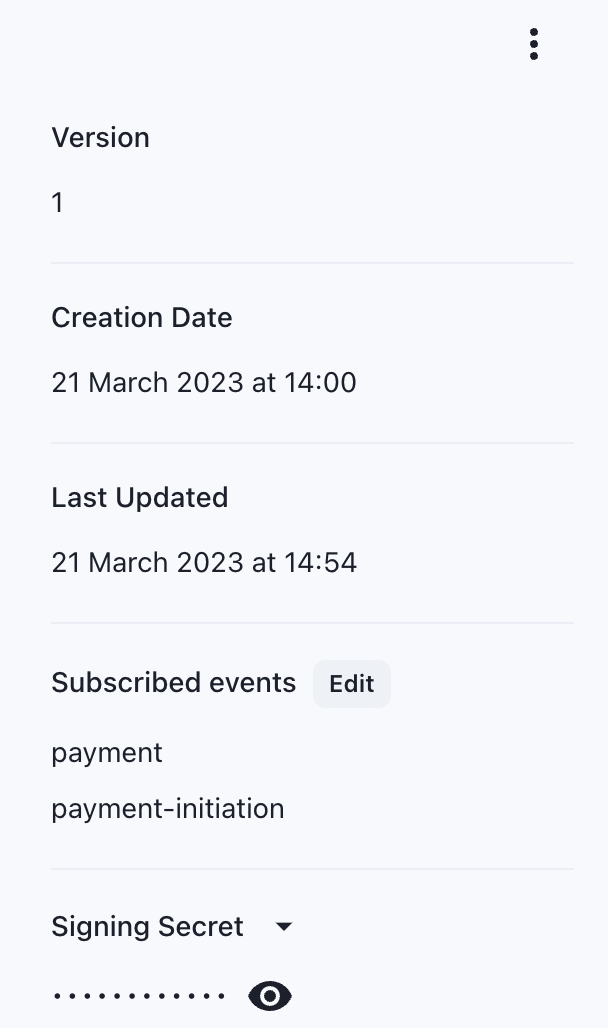
Per subscription, a signing secret is provided by Svix to use for verification. This is returned in the response if creating a [subscription via API]#via-api). Alternatively, this can be referenced on the subscription details in the Svix portal, as shown below:
Using an Official Library
Svix provides official verification libraries that can be used based on the language of your platform.
An example is shown below using the Node.js (Express), but various other popular languages (such as Java, Python, ) and frameworks are also supported.
// Taken from https://docs.svix.com/receiving/verifying-payloads/how#nodejs-express

import bodyParser from 'body-parser';
import { Webhook } from 'svix';

const secret = 'YOUR_SVIX_SECRET_HERE';

app.post('/webhook', bodyParser.raw({ type: 'application/json' }), (req, res) => {
  const payload = req.body;
  const headers = req.headers;

  const wh = new Webhook(secret);
  let msg;
  try {
    msg = wh.verify(payload, headers);
  } catch (err) {
    res.status(400).json({
      message: err.toString(),
    });
  }

  // Process message and update internal payment/order status

  res.json({
    message: 'Webhook received successfully',
  });
});
Performing Verification Manually
If you are unable to use an official Svix library to verify your webhooks (because your framework is unsupported, for example), you should implement manual verification logic as follows:
- Construct a signed payload by concatenating the following webhook-specific values with the full-stop character
.:svix_idandsvix_timestampheader values from the webhook, andbodybeing the entire raw/unchanged request body of the webhook.
signedContent = '${svix_id}.${svix_timestamp}.${body}';
- Calculate the signature value of the signed content, by applying an HMAC-SHA256 algorithm to it. Use the base64-portion of your subscription's Signing Secret i.e. the secret value following the
whsec_prefix:
// Taken from https://docs.svix.com/receiving/verifying-payloads/how-manual

const crypto = require('crypto');

signedContent = `${svix_id}.${svix_timestamp}.${body}`;
const secret = 'whsec_5WbX5kEWLlfzsGNjH64I8lOOqUB6e8FH';

// Need to base64 decode the secret
const secretBytes = new Buffer(secret.split('_')[1], 'base64');
const signature = crypto.createHmac('sha256', secretBytes).update(signedContent).digest('base64');

console.log(signature);
- Confirm whether the generated signature matches an expected signature provided in the webhook header
svix-signature.
Note that this header may contain a list of space delimited signatures, with corresponding version identifiers, such as the below example:
v1,bm9ldHUjKzFob2VudXRob2VodWUzMjRvdWVvdW9ldQo= v2,MzJsNDk4MzI0K2VvdSMjMTEjQEBAQDEyMzMzMzEyMwo=
The signature value follows the version identifier and comma delimiter (such as v1,). Most commonly, this header will comprise of a single signature, unless webhook signing secrets are being rotated.
When evaluating the request body for Svix verification (whether using a library or verifying manually), ensure you use the raw request body. The cryptographic signature is sensitive to even the slightest changes (including whitespaces, carriage returns, etc.) which may result in failed verification.
Frameworks that initially parse the request as JSON, and later stringify this, may also break the signature verification.
In the express sample below, Node JS body parsing middleware is used.
Webhook Acknowledgement
In the case of expected verification and processing on your server, you should respond with a 200 (successful) HTTP response on each webhook notification. This results in Svix noting the notification as successfully received. This would also be reflected on your Svix subscription on the consumer portal.
Should there be any failure in Svix attempting to deliver a webhook notification (in the case you return a failure status code, or your endpoint is down), will retry sending the webhook, based on a retry policy with exponential backoff. This retry policy is detailed further here.
Whitelisting Source IPs
In case your webhook endpoint is behind a firewall or NAT, you will need to allow traffic from Svix's IP addresses. Since Stitch's Svix account is in the EU region, refer to the Svix documentation for the relevant IP addresses for the region.
Authenticating Webhook Deliveries with mTLS
In addition to signature verification, webhook deliveries can authenticate themselves to your server with a client certificate, using mutual TLS (mTLS). When configured, every delivery to your endpoint presents the certificate during the TLS handshake, allowing your server to cryptographically verify the caller before accepting the request.
mTLS is configured per webhook subscription, self-service, via the Svix portal:
- Generate a keypair and client certificate for the webhook sender to present. The certificate may be issued by your internal CA, a public CA, or self-signed — whichever your security policy prefers.
- On your endpoint in the Svix portal, open the
Advancedtab and selectConfigure mTLS. Upload the PEM-encoded private key and certificate (include the full chain if your CA uses intermediates). - If your webhook endpoint's server certificate is issued by a private or internal CA, also upload that CA certificate in the same dialog, so the TLS connection to your server can be verified during delivery.
- Configure your receiving server to require a client certificate and trust the certificate (or its issuing CA) you uploaded.
If your security policy does not permit the certificate's private key to be generated on (or transmitted to) your side, Stitch can instead generate the keypair and issue the certificate from the Stitch private Certificate Authority, providing you the CA chain to trust on your server. Contact your Stitch integration contact to arrange this.
Stitch also supports mTLS in the opposite direction — authenticating your calls to the Stitch APIs with a client certificate. See mTLS endpoints for details.
Svix Portal Operations
The Svix consumer portal exists as a useful reference throughout integrating and being live with Stitch, to facilitate any webhook operations required. Aside from creating webhook subscriptions, as described above, you can also use the Svix portal to:
- Modify existing subscription endpoints,
- View event types and their schema under the
Event Catalogsection, - View events previously sent under the
Logssection, - Retry sending of any webhooks (whether previously successful or failed),
- Rate limit requests to your webhook endpoint (specified as requests per second), and
- Add custom request headers to include as part of each webhook sent to your endpoint.
Some of these operations are elaborated on below.
Adding Custom Headers
Alongside the webhook event data itself, your application might require certain custom headers to be included in each notification. A common example is adding an authentication layer in a specific header, for additional security on your endpoint.
For any created subscription, you may set one or more custom headers via the Svix portal, under the subscription's Advanced tab, within the Custom Headers section.
An example of this view is shown below:
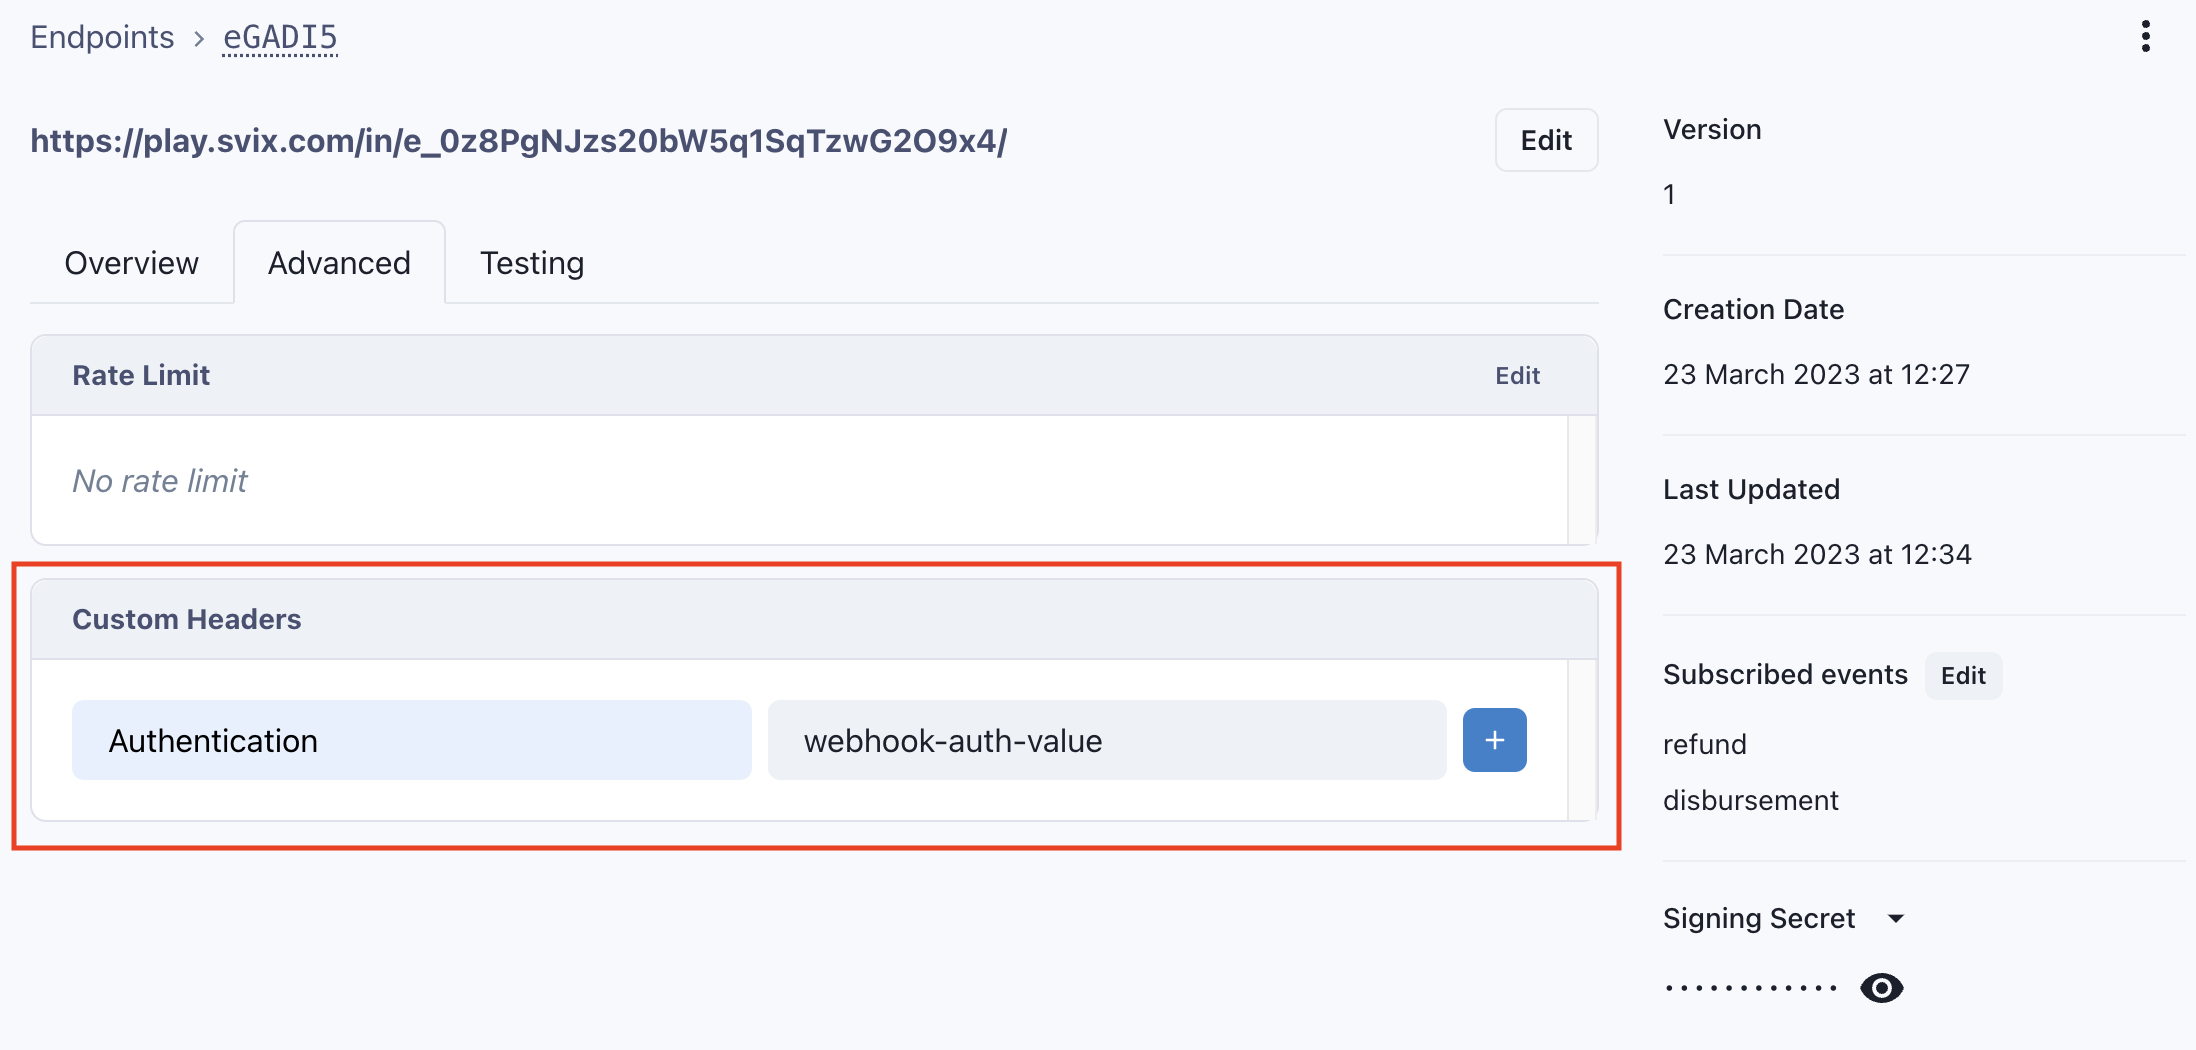
Only values with Authorization as the header's key name will have plaintext values hidden on the Svix portal.
Any other key names will have values displayed in plaintext.
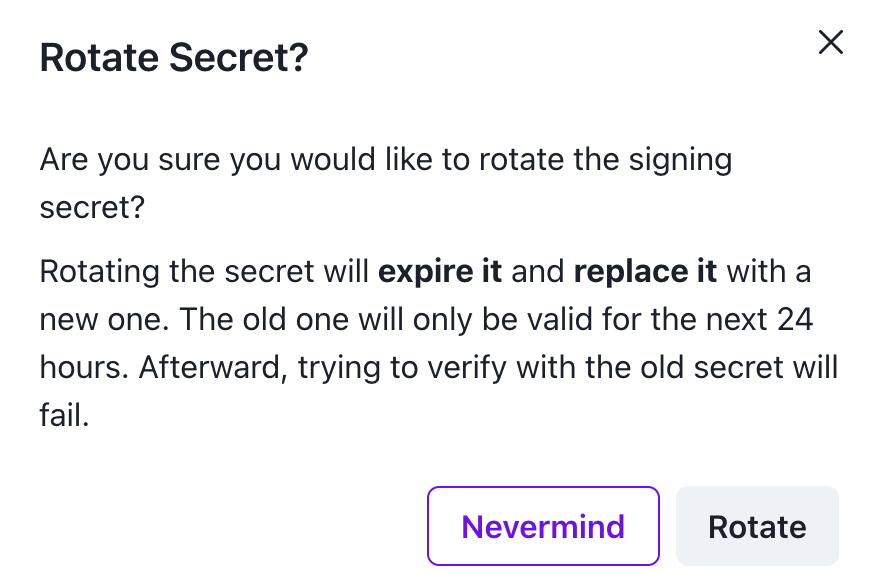
Signing Secret Rotation
Should your Svix secret ever be compromised (whether confirmed, or suspected), it should immediately be rotated to ensure security and integrity of your payment processing.
On the details page of the webhook subscription, select the dropdown in the top right corner, and select the Rotate Secret option.
Upon confirming to rotate the secret, a new secret will be set for signature verification. You should then configure and set this updated signing secret within your signature verification process.
If you are using one of the Svix libraries for signature verification, verification against new signatures will automatically be taken care of.
Alternatively, if you are manually verifying signatures, ensure you are evaluating all secrets provided in the svix-signature header.
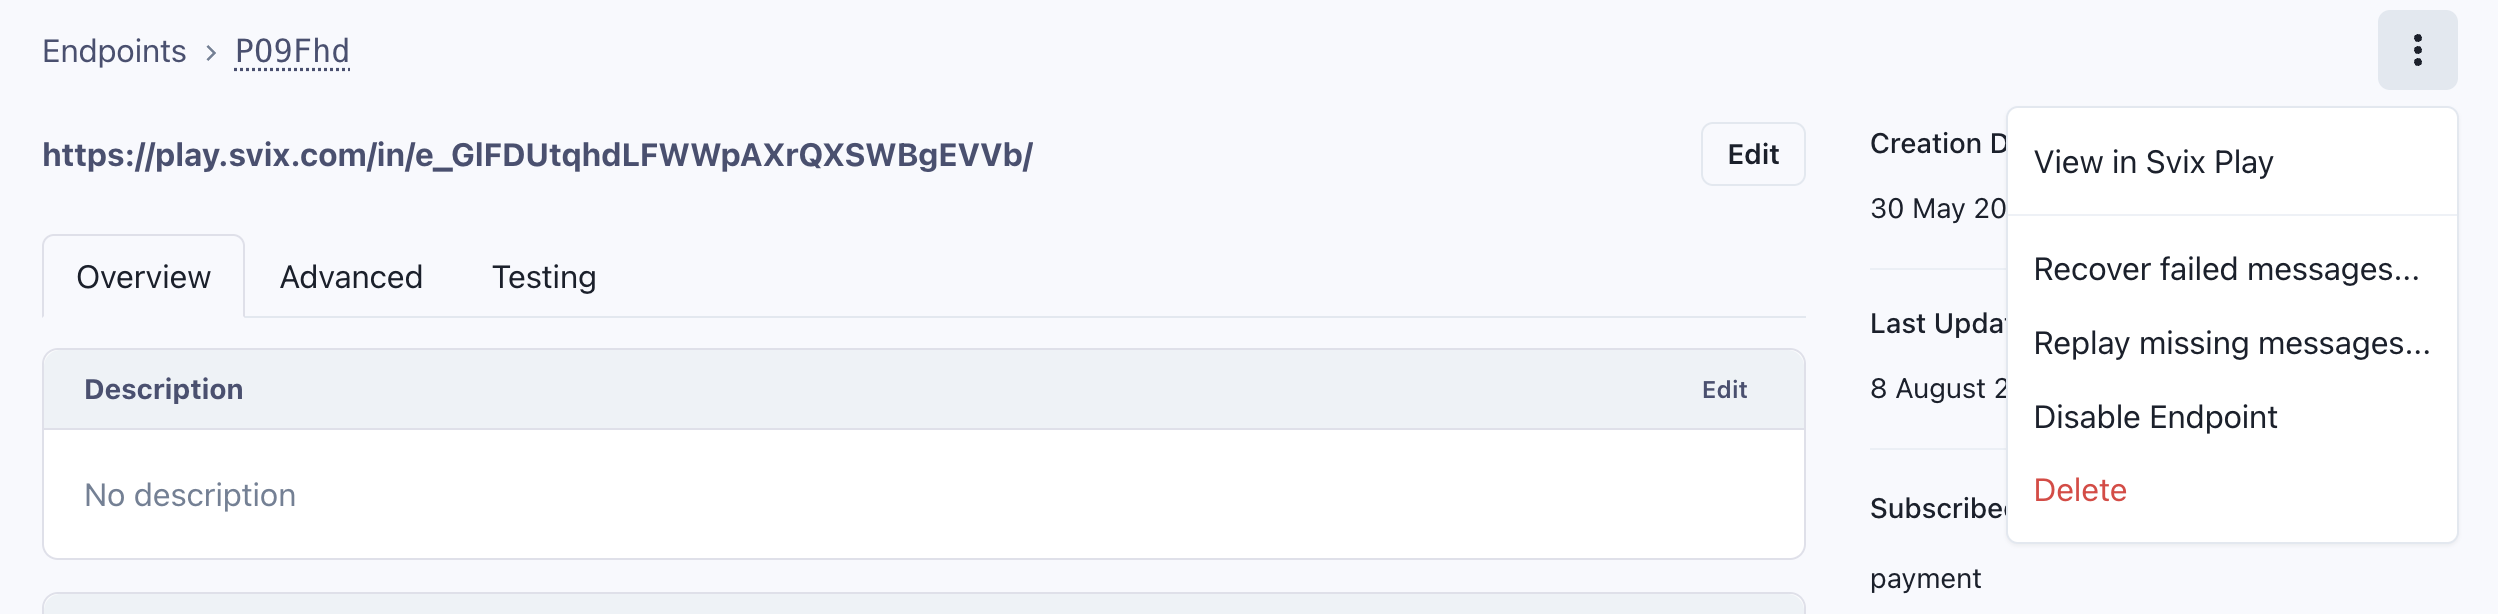
Manually Replaying Webhooks
The application portal can be used to manually resend messages (whether previously failed or successfully sent) at any time, for all messages that are still available and stored on Svix. To:
- Resend all previously failed messages on the endpoint ('Recover failed messages'), or
- Resend all messages that were previously unattempted to be sent to the endpoint ('Replay missing messages'), or
you can select the respective option within the dropdown menu of your webhook endpoint subscription, as shown below:
Alternatively, if you only need to replay a specific message, you can select the dropdown on the selected message as shown below:

Note that Svix has a data retention period of 90 days, for all webhook messages. After this period, these will be deleted on Svix.
Webhook Operations over API
In addition to using the Svix portal to check and modify your webhook subscriptions, a few operations may also be performed via the Stitch GraphQL API, if required.
List Webhook Subscriptions
To list your webhook subscriptions and endpoints using our API, the following webhookEndpoints query can be run:
Excluding the filter parameter returns all webhook types currently subscribed to, on your client.
Deleting an Existing Subscription
To unsubscribe or remove a webhook subscription you can run the clientWebhookDelete mutation. You can unsubscribe to a specific event type by providing a filterTypes input.
Otherwise, if you wish to delete the entire endpoint, the filterTypes field can be omitted entirely.
The following example mutation shows deleting the refund type subscription from the webhook subscription on https://my-webhook-server.co.
Migrating to Svix
This is only to be used by clients that are still using our legacy webhook subscriptions.
To move from receiving webhooks directly from us, and start receiving them via Svix, the clientSubscriptionMigrate mutation
can be run on your client. Only the ID of the existing legacy subscription is required in the request, as shown in the example query below:
After running the migrate mutation, your consumed events may fail verification if you have not yet accounted for updated Svix logic (including signature verification differences and updated webhook structures). If failures are occurring, you can log into the Svix portal and replay failed messages as required.
Another method you can follow for migration is to create a new URL dedicated to receiving Svix webhooks, that runs in parallel with your existing legacy endpoint until fully tested and working. In this case, the migration mutation would not be required.